Tag Archives: time lapse

Photographing Lightning during The Day or Night with a DSLR

Capturing lightning using a neutral density filter and long exposure

As many of you know, I’m an avid time lapse videographer, and the original purpose of our Flicker Free filter was time lapse. I needed a way to deflicker all those night to day and day to night time lapses. I also love shooting long exposure photos.

As it turns out, this was pretty good experience to have when it came to capturing a VERY rare lightning storm that came through San Francisco late last year.

Living in San Francisco, you’re lucky if you see more than a 3 or 4 lightning bolts a year. Very different from the lightning storms I saw in Florida when I lived there for a year. However, we were treated to a definitely Florida-esqe lightning storm last September. Something like 800 lightning strikes over a few hours. It was a real treat and gave me a chance to try and capture lightning! (in a camera)

The easiest way to capture lightning is just flip your phone’s camera into video mode and point in the direction you hope the lightning is going to be at. Get the video and then pull out a good frame. This works… but video frames are usually heavily compressed and much lower resolution than a photo.

I wanted to use my 30mp Canon 5DmarkIV to get photos, not the iPhone’s mediocre video camera.

Problems, Problems, Problems

To get the 5D to capture lightning, I needed at the very least: 1) a tripod and 2) an intervalometer.

Lightning happens fast. Like, speed of light fast. Until you try and take a picture of it, you don’t realize exactly how fast. If you’re shooting video (30fps), the bolt will happen over 2, maybe 3 frames. if you’ve got a fancy 4K (or 8K!) camera that will shoot 60 or 120fps, that’s not a bad place to start.

However, if you’re trying to take advantage of your 5D’s 6720 × 4480 sensor… you’re not going to get the shot handholding it and manually pressing the shutter. Not going to happen. Cloudy with a chance of boring-ass photos.

So set the camera up on a tripod and plugin in your intervalometer. You can use the built-in, but the external one gives you more options. You want the intervalometer firing as fast as possible but that means only once every second. During the day, that’s not going to work.

Lightning And Daylight

The storm started probably about an hour before sunset. It was cloudy, but there was still a fair amount of light.

At first I thought, “once every second should be good enough”. I was wrong. Basically, the lightning had to happen the exact moment the camera took the picture. Possible, but the odds are against you getting the shot.

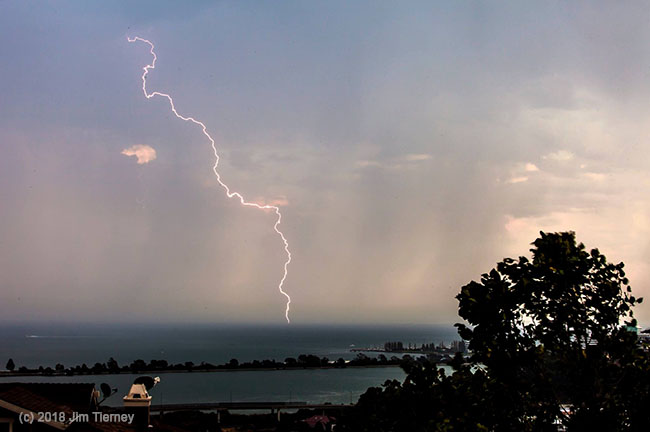
As mentioned, I like shooting long exposures. Sometimes at night but often during the day. To achieve this, I have several neutral density filters which I stack on top of each other. They worked great for this. I stacked a couple .9 ND filters on the lens, bringing it down 6 stops. This was enough to let me have a 1/2 sec. shutter speed.

1/2 sec. shutter speed and 1 sec. intervals… I’ve now got a 50/50 chance of getting the shot… assuming the camera is pointed in the direction of the lightning. Luckily it was striking so often, that I could make a good guess as to the area it was going to be in.  As you can see from the above shot, I got some great shots out of it.

Night Lightning

Photographing lightning at night with a Canon 5D

To the naked eye, it was basically night. So with a 2 second exposure and a 2 second interval… as long as the lightning happened where the camera was pointed, I was good to go. (it wasn’t quite night, so with the long exposure you got the last bits of light from sunset) I did not need the neutral density filters as it was pretty dark.

By this point the storm had moved. The lightning was less consistent and a bit further away. So I had to zoom in a bit, reducing the odds of getting the shot. But luck was still with me and I got a few good shots in this direction as well.

I love trying to capture stuff you can’t really see with the naked eye, whether it’s using time lapse to see how clouds move or long exposure to see water flow patterns. Experimenting with capturing lightning was a blast. Just wish we saw more of it here in SF!

So hopefully this gave you some ideas about how to capture lightning, or anything else that moves fast, next time you have a chance!

Speeding Up De-flickering of Time Lapse Sequences in Premiere

Time lapse is always challenging… you’ve got a high resolution image sequence that can seriously tax your system. Add Flicker Free on top of that… where we’re analyzing up to 21 of those high resolution images… and you can really slow a system down. So I’m going to go over a few tips for speeding things up in Premiere or other video editor.

First off, turn off Render Maximum Depth and Maximum Quality. Maximum Depth is not going to improve the render quality unless your image sequence is HDR and the format you’re saving it to supports 32-bit images. If it’s just a normal RAW or JPEG sequence, it  won’t make much of a difference. Render Maximum Quality may make a bit of difference but it will likely be lost in whatever compression you use. Do a test or two to see if you can tell the difference (it does improve scaling) but I rarely can.

RAW: If at all possible you should shoot your time lapses in RAW. There are some serious benefits which I go over in detailed in this video: Shooting RAW for Time Lapse. The main benefit is that Adobe Camera RAW automatically removes dead pixels. It’s a big f’ing deal and it’s awesome. HOWEVER… once you’ve processed them in Adobe Camera RAW, you should convert the image sequence to a movie or JPEG sequence (using very little compression). It will make processing the time lapse sequence (color correction, effects, deflickering, etc.) much, much faster. RAW is awesome for the first pass, after that it’ll just bog your system down.

Nest, Pre-comp, Compound… whatever your video editing app calls it, use it. Don’t apply Flicker Free or other de-flickering software to the original, super-high resolution image sequence. Apply it to whatever your final render size is… HD, 4K, etc.

Why? Say you have a 6000×4000 image sequence and you need to deliver an HD clip. If you apply effects to the 6000×4000 sequence, Premiere will have to process TWELVE times the amount of pixels it would have to process if you applied it to HD resolution footage. 24 million pixels vs. 2 million pixels. This can result in a HUGE speed difference when it comes time to render.

How do you Nest?

This is Premiere-centric, but the concept applies to After Effects (pre-compose) or FCP (compound) as well. (The rest of this blog post will be explaining how to Nest. If you already understand everything I’ve said, you’re good to go!)

First, take your original image sequence (for example, 6000×4000 pixels) and put it into an HD sequence. Scale the original footage down to fit the HD sequence.

Hi-Res images inside an HD sequenceThe reason for this is that we want to control how Premiere applies Flicker Free. If we apply it to the 6000×4000 images, Premiere will apply FF and then scale the image sequence. That’s the order of operations. It doesn’t matter if Scale is set to 2%. Flicker Free (and any effect) will be applied to the full 6000×4000 image.

So… we put the big, original images into an HD sequence and do any transformations (scaling, adjusting the position and rotating) here. This usually includes stabilization… although if you’re using Warp Stabilizer you can make a case for doing that to the HD sequence. That’s beyond the scope of this tutorial, but here’s a great tutorial on Warp Stabilizer and Time Lapse Sequences.

Next, we take our HD time lapse sequence and put that inside a different HD sequence. You can do this manually or use the Nest command.

Apply Flicker Free to the HD sequence, not the 6000x4000 imagesNow we apply Flicker Free to our HD time lapse sequence. That way FF will only have to process the 1920×1080 frames. The original 6000×4000 images are hidden in the HD sequence. To Flicker Free it just looks like HD footage.

Voila! Faster rendering times!

So, to recap:

  • Turn off Render Maximum Depth
  • Shoot RAW, but apply Flicker Free to a JPEG sequence/Movie
  • Apply Flicker Free to the final output resolution, not the original resolution

Those should all help your rendering times. Flicker Free still takes some time to render, none of the above will make it real time. However, it should speed things up and make the render times more manageable if you’re finding them to be really excessive.

Flicker Free is available for Premiere Pro, After Effects, Final Cut Pro, Avid, Resolve, and Assimilate Scratch. It costs $149. You can download a free trial of Flicker Free here.

Why Doesn’t FCP X Support Image Sequences for Time Lapse (among other reasons)

In the process of putting together a number of tutorials on time lapse (particularly stabilizing it), I discovered that FCP X does not import image sequences. If you import 1500 images that have a name with sequential numbers, it imports them as 1500 images. This is a pretty huge fail on the part of FCP. Since it is a video application, I would expect it to do what every other video application does and recognize the image sequence as VIDEO.  Even PHOTOSHOP is smart enough to let you import a series of images as an image sequence and treat it as a video file. (and, no, you should not be using the caveman like video tools in Photoshop for much of anything, but I’m just sayin’ it imports it correctly)

There are ways to get around this. Mainly use some other app or Quicktime to turn the image sequence into a video file.  I recommend shooting RAW when shooting time lapse,  so this means you have to pull the RAW sequence into one of the Adobe apps anyways (Lightroom, After Effects, Premiere) for color correction.  It would be much nicer if FCP just handled it correctly without having to jump through the Adobe apps. Once you’re in the Adobe system, you might as well stay there, IMO.

No, I’m not a FCP X hater. I just like my apps to work the way they should… just as I tore into Premiere and praised FCP for their .f4v (Flash video) support in this blog post.

Time Lapse image sequence in Final Cut Pro failing to load as a single video file


What’s wrong with this picture?