
One key way of speeding up the Flicker Free plugin is putting it first in the order of effects. What does this mean? Let’s say you’re using the Lumetri Color Corrector in Premiere. You want to apply Flicker Free first, then apply Lumetri. You’ll see about a 300+% speed increase vs. doing it with Lumetri first. So it looks like this:
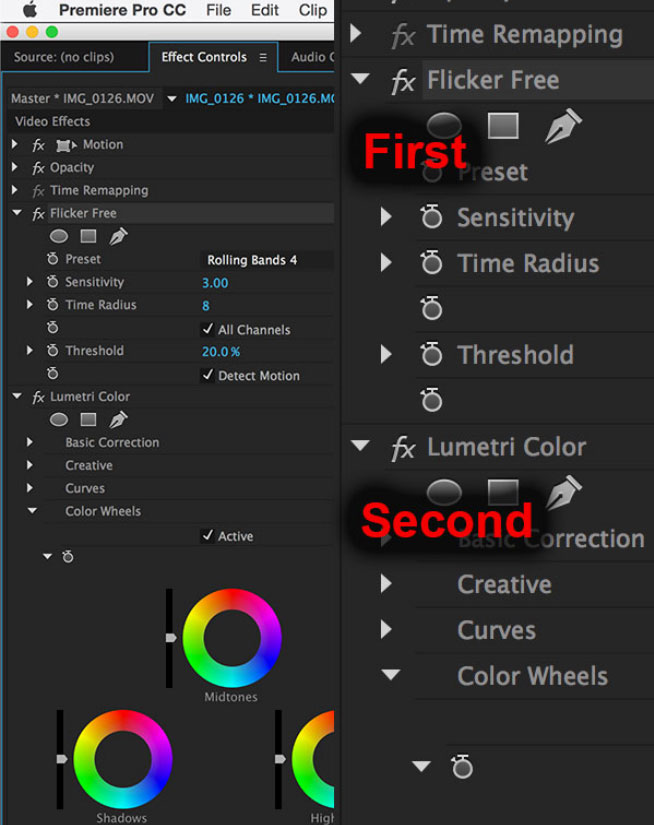
Why the Speed Difference?
Flicker Free has to analyze multiple frames to de-flicker the footage you’re using. It looks at up to 21 frames. If you have the effect applied before Flicker Free it means Lumetri is being applied TWENTY ONE times for every frame Flicker Free renders. And especially with a slow effect like Lumetri that will definitely slow everything down.
It fact, on slower machines it can bring Premiere to a grinding halt. Premiere has to render the other effect on 21 frames in order to render just one frame for Flicker Free. In this case, Flicker Free takes up a lot of memory, the other effect can take up a lot of memory and things start getting ugly fast.
Renders with Happy Endings
So to avoid this problem, just apply Flicker Free before any other effects. This goes for pretty much every video editing app. The render penalty will vary depending on the host app and what effect(s) you have applied. For example, using the Fast Color Corrector in Premiere Pro resulted in a slow down of only about 10% (vs. Lumetri and a slow down of 320%). In After Effects the slow down was about 20% with just the Synthetic Aperture color corrector that ships with AE. However, if you add more filters it can get a lot worse.
Either way, you’ll have much happier render times if you put Flicker Free first.
Hopefully this makes some sense. I’ll go into a few technical details for those that are interested. (Feel free to stop reading if it’s clear you just need to put Flicker Free first) (oh, and here are some other ways of speeding up Flicker Free)
Technical Details
With all host applications, Flicker Free, like all plugins, has to request frames through the host application API. With most plugins, like the Beauty Box Video plugin, the plugin only needs to request the current frame. You want to render frame X: Premiere Pro (or Avid, FCP, etc) has to load the frame, render any plugins and then display it. Plugins get rendered in the order you apply them. Fairly straightforward.
The Flicker Free plugin is different. It’s not JUST looking at the current frame. In order to figure out the correct luminance for each pixel (thus removing flicker) it has to look at pixels both before and after the current frame. This means it has to ask the API for up to 21 frames, analyze them, return the result to Premiere, which then finishes rendering the current frame.
So the API says, “Yes, I will do your bidding and get those 21 frames. But first, I must render them!”. And so it does. If there are no plugins applied to them, this is easy. It just hands Flicker Free the 21 original frames and goes on its merry way. If there are plugins applied, the API has to render those on each frame it gives to Flicker Free. FF has to wait around for all 21 frames to be rendered before it can render the current frame. It waits, therefore that means YOU wait. If you need a long coffee break these renders can be great. If not, they are frustrating.
If you use After Effects you may be familiar with pre-comping a layer with effects so that you can use it within a plugin applied to a different layer. This goes through a different portion of the API than when a plugin requests frames programmatically from AE. In the case of a layer in the layer pop-up the plugin just gets the original image with no effects applied. If the plugin actually asks AE for the frame one frame before it, AE has to render it.
One other thing that affects speed behind the scenes… some apps are better at caching frames that plugins ask for than other apps. After Effects does this pretty well, Premiere Pro less so. So this helps AE have faster render times when using Flicker Free and rendering sequentially. If you’re jumping around the timeline then this matters less.
Hopefully this helps you get better render times from Flicker Free. The KEY thing to remember however, is ALWAYS APPLY FLICKER FREE FIRST!
Happy Rendering!