Tag Archives: plugin

F’ing GPUs

One of the fun challenges of developing graphics software is dealing with the many, varied video cards and GPUs out there. (actually, it’s a total pain in the ass. Hey, just being honest :-)

There are a lot of different video cards out there and they all have their quirks. Which are complicated by the different operating systems and host applications… for example, Apple decides they’re going to more or less drop OpenCL in favor of Metal, which means we have to re-write quite a bit of code, Adobe After Effects and Adobe Premiere Pro handle GPUs differently even though it’s the same API, etc. etc. From the end user side of things you might not realize how much development goes into GPU Acceleration. It’s a lot.

The latest release of Beauty Box Video for Skin Retouching (v4.1) contains a bunch of fixes for video cards that use OpenCL (AMD, Intel). So if you’re using those cards it’s a worthwhile download. If you’re using Resolve and Nvidia cards, you also want to download it as there’s a bug with CUDA and Resolve and you’ll want to use Beauty Box in OpenCL mode until we fix the CUDA bug. (Probably a few weeks away) Fun times in GPU-land.

4.1 is a free update for users of the 4.0 plugin. Download the demo and it should automatically remove the older version and recognize your serial number.

Just wanted to give you all some insight on how we spend our days around here and what your hard earned cash goes into when you buy a plugin. You know, just in case you’re under the impression all software developers do is ‘work’ at the beach and drive Ferraris around. We do have fun, but usually it involves nailing the video card of the month to the wall and shooting paintballs at it. ;-)

De-flickering Bix Pix’s Stop Motion Animation Show ‘Tumble Leaf’ with Flicker Free

Like Digital Anarchy On FacebookLike us on Facebook!

One of the challenges with stop motion animation is flicker. Lighting varies slightly for any number of reasons causing the exposure of every frame to be slightly different. We were pretty excited when Bix Pix Entertainment bought a bunch of Flicker Free licenses (our deflicker plugin) for Adobe After Effects. They do an amazing kids show for Amazon called Tumble Leaf that’s all stop motion animation. It’s won multiple awards, including an Emmy for best animated preschool show.

Many of us, if not most of us, that do VFX software are wannabe (or just flat out failed ;-) animators. We’re just better at the tech than the art. (exception to the rule: Bob Powell, one of our programmers, who was a TD at Laika and worked on Box Trolls among other things)

So we love stop motion animation. And Bix Pix does an absolutely stellar job with Tumble Leaf. The animation, the detailed set design, the characters… are all off the charts. I’ll let them tell it in their own words (below). But check out the 30 second deflicker example below (view at full screen as the Vimeo compression makes the flicker hard to see). I’ve also embedded their ‘Behind The Scenes’ video at the end of the article. If you like stop motion, you’ll really love the ‘Behind the Scenes’.

From the Bix Pix folks themselves… breaking down how they use Flicker Free  in their Adobe After Effects workflow:

——————————————————————-

Using Digital Anarchy’s Flicker Free at Bix Pix

Bix Pix Entertainment is an animation studio that specializes in the art of stop-motion animation, and is known for their award-winning show Tumble Leaf on Amazon Prime.

It is not uncommon for an animator to labor for days sometimes weeks on a single stop motion shot, working frame by frame. With this process, it is natural to have some light variations between each exposure, commonly referred to as ‘flicker’ – There are many factors that can cause the shift in lighting. For instance, a studio light or lights may blow out or solar flare. Voltage and/ power surges can brighten or dim lights over a long shot. Certain types of lights, poor lighting equipment, camera malfunctions or incorrect camera settings. Sometimes an animator might wear a white t-shirt unintentionally adding fill to the shot or accidentally standing in front of a light casting a shadow from his or her body.

The variables are endless. Luckily these days compositors and VFX artists have fantastic tools to help remove these unwanted light shifts. Removing unwanted light shifts and flicker is a very important and necessary first step when working with stop-motion footage. Unless by chance it’s an artistic decision to leave that tell-tale flicker in there. But that is a rare decision that does not come about often.

Here at Bix Pix we use Adobe After Effects for all of our compositing and clean-up work. Having used 4 different flicker removal plugins over the years, we have to say Digital Anarchy’s flicker Free is the fastest, easiest and most effective flicker removal software we have come across. And also quite affordable.

During a season of Tumble Leaf we will process between 1600 and 2000 shots averaging between 3 seconds and up to a couple minutes in length. That is an average of about 5 hours of footage per season, almost three times the length of a feature film. With a tight schedule of less than a year and a small team of ten or so VFX artists and compositors. Nearly every shot has an instance of flicker free applied to it as an effect. The plugin is so fast, simple to use and reliable. De-flickering can be done in almost real time.

Digital Anarchy’s Flicker free has saved us thousands of hours of work and reduced overtime and crunch time delays. This not only saves money but frees up artists to do more elaborate effects that we could not do before due to time constraints, allowing them to focus on making their work stand out even more.

If you are shooting stop-motion animation and require flicker free footage, this is the plugin to use.

———————————————–

For a breakdown of how they do Tumble Leaf, you should definitely check out the Behind the Scenes video!

I even got to meet the lead character, Fig! My niece and nephew (4 and 6) were very impressed. :-)

Hanging out with Fig at BixPix Entertainment

Cheers,
Jim Tierney
Chief Executive Anarchist
Digital Anarchy

Comparing Beauty Box To other Video Plugins for Skin Retouching/Digital Makeup

We get a lot of questions about how Beauty Box compares to other filters out there for digital makeup. There’s a few things to consider when buying any plugin and I’ll go over them here. I’m not going to compare Beauty Box with any filter specifically, but when you download the demo plugin and compare it with the results from other filters this is what you should be looking at:

  • Quality of results
  • Ease of use
  • Speed
  • Support

Support

I’ll start with Support because it’s one thing most people don’t consider. We offer as good of support as anyone in the industry. You can email or call us (415-287-6069). M-F 10am-5pm PST. In addition, we also check email on the weekends and frequently in the evenings on weekdays. Usually you’ll get a response from Tor, our rockstar QA guy, but not infrequently you’ll talk to myself as well. Not often you get tech support from the guy that designed the software. :-)

Quality of Results

The reason you see Beauty Box used for skin retouching on everything from major tentpole feature films to web commercials, is the incredible quality of the digital makeup. Since it’s release in 2009 as the first plugin to specifically address skin retouching beyond just blurring out skin tones, the quality of the results has been critically acclaimed. We won several awards with version 1.0 and we’ve kept improving it since then. You can see many examples here of Beauty Box’s digital makeup, but we recommend you download the demo plugin and try it yourself.

Things to look for as you compare the results of different plugins:

Skin Texture: Does the skin look realistic? Is some of the pore structure maintained or is everything just blurry? It should, usually, look like regular makeup unless you’re going for a stylized effect.
Skin Color: Is there any change in skin tones?
Temporal Consistency: Does it look the same from frame to frame over time? Are there any noticeable seams where the retouching stops.
Masking: How accurate is the mask of the skin tones? Are there any noticeable seams between skin and non-skin areas? How easy is it to adjust the mask?

Ease of Use

One of the things we strive for with all our plugins is to make it as easy as possible to get great results with very little work on your end. Software should make your life easier.

In most cases, you should be able to click on Analyze Frame, make an adjustment to the Skin Smoothing amount to dial in the look you want and be good to go. There are always going to be times when it requires a bit more work but for basic retouching of video, there’s no easier solution than Beauty Box.

When comparing filters, the thing to look for here is how easy is it to setup the effect and get a good mask of the skin tones? How long does it take and how accurate is it?

Speed

If you’ve used Beauty Box for a while, you know that the only complaint we had with it with version 1.0 was that it was slow. No more! It’s now fully GPU optimized and with some of the latest graphics cards you’ll get real time performance, particularly in Premiere Pro. Premiere has added better GPU support and between that the Beauty Box’s use of the GPU, you can get real time playback of HD pretty easily.

And of course we support many different host apps, which gives you a lot of flexibility in where you can use it. Avid, After Effects, Premiere Pro, Final Cut Pro, Davinci Resolve, Assimilate Scratch, Sony Vegas, and NUKE are all supported.

Hopefully that gives you some things to think about as you’re comparing Beauty Box with other plugins that claim to be as good. All of these things factor into why Beauty Box is so highly regarded and considered to be well worth the price.

Beauty Work for Corporate Video

Like Digital Anarchy On Facebook


We love to talk about how Beauty Box Video is used on feature films by the likes of Local Hero Post and Park Road Post Production  or broadcast TV by NBC or Fox. That’s the big, sexy stuff.

However, many, if not most, of our customers are like Brian Smith. Using Beauty Box for corporate clients or local commercials. They might not be winning Emmy awards for their work but they’re still producing great videos with, usually, limited budgets.   “The time and budget does not usually afford us the ability to bring in a makeup artist.  People that aren’t used to being on camera are often very self-conscious, and they cringe at the thought of every wrinkle or imperfection detracting from their message.”, said Brian, Founder of Ideaship Studios in Tulsa, OK. “Beauty Box has become a critical part of our Final Cut X pipeline because it solves a problem, it’s blazing fast, and it helps give my clients and on-camera talent confidence.  They are thrilled with the end result, and that leads to more business for us.”

An Essential Tool for Beauty Work and Retouching

Beauty Box Video has become an essential tool at many small production houses or in-house video departments to retouch makeup-less/bad lighting situations and still end up with a great looking production. The ability to quickly retouch skin with an automatic mask without needing to go frame by frame is important. However, it’s usually the quality of retouching that Beauty Box provides that’s the main selling point.

Example of Brian Smith's skin retouching for a corporate client
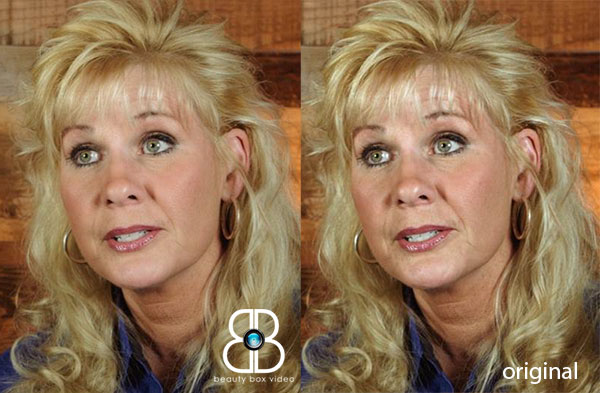
image courtesy of Ideaship Studios

Beauty Box goes beyond just blurring skin tones. We strive to keep the skin texture and not just mush it up. You want to have the effect of the skin looking like skin, not plastic, which is important for beauty work. Taking a few years off talent and offsetting the harshness that HD/4K and video lights can add to someone. The above image of one of Brian’s clients is a good example.

When viewed at full resolution, the wrinkles are softened but not obliterated. The skin is smoothed but still shows pores. The effect is really that of digital makeup, as if you actually had a makeup artist to begin with. You can see this below in the closeup of the two images. Of course, the video compression in the original already has reduced the detail in the skin, but Beauty Box does a nice job of retaining much of what is there.

Closeup of the skin texture retained by Beauty Box

” On the above image, we did not shoot her to look her best. The key light was a bit too harsh, creating shadows and bringing out the lines.  I applied the Beauty Box Video plugin, and the shots were immediately better by an order of magnitude.  This was just after simply applying the plugin.  A few minutes of tweaking the mask color range and effects sliders really dialed in a fantastic look. I don’t like the idea of hiding flaws.  They are a natural and beautiful part of every person.  However, I’ve come to realize that bringing out the true essence of a person or performance is about accentuating, not hiding.  Beauty Box is a great tool for doing that.” – Brian Smith

Go for Natural Retouching

Of course, you can go too far with it, as with anything. So some skill and restraint is often needed to get the effect of regular makeup and not making the subject look ‘plastic’ or blurred. As Brain says, you want things to look natural.

However, when used appropriately you can get some amazing results, making for happy clients and easing the concerns of folks that aren’t always in front of a camera. (particularly men, since they tend to not want to wear makeup… and don’t realize how much they need it until they see themselves on a 65″ 4K screen. ;-)

One last tip, you can often easily improve the look of Beauty Box even more by using tracking masks for beauty work, as you can see in the tutorials that link goes to. The ability of these masks to automatically track the points that make up the mask and move them as your subject moves is a huge deal for beauty work. It makes it much easier to isolate an area like a cheek or the forehead, just as a makeup artist would.