Tag Archives: plugins

Digital Anarchy NAB Plans and Free NAB 2023 Exhibits Pass Code

NAB is around the corner and it seems to be getting back to normal-ish. At least, my read on the buzz around it is that folks are a lot less tentative about it than last year. The show floor seems mostly full, so a lot more companies than last year will be there. It was great to see folks in person last year, so hopefully we’ll see more of you this year.

BUT! I’d really like to hear from all of you! So, as we’ve done the last couple years, we’d appreciate it if you’d let us know if you’re going to NAB or not. The survey is short… 3 required questions and some other questions/comments you can fill out if you’re so inclined. But only three are required, so it should take you about 30 seconds. We’ll pick two people from the folks that responded to win a plugin of their choice… to give you a bit of incentive to fill it out.

Anyways, fill out the survey and let us know if we’ll be seeing you in person or just following us online! Survey link: https://survey.zohopublic.com/zs/HcCzVI

We’ll be there in booth N1217 (next to Avid) showing off at least one new plugin and maybe even two new plugins! We’re doing the usual plugin mafia thing with Revision Effects and Left Angle.

If you’d like to join and need a free Exhibits Pass, the code is: LV98226 Register at www.nabshow.com

Why we charge upgrade fees

Most of the updates we release are free for users that have purchased the most recent version of the plugin. However, because we are not subscription based (we still do that old fashioned perpetual license thing), if you don’t own the latest version of the plugin… you have to upgrade to it.

It requires a TON of work to keep software working with all the changes Apple, Adobe, Nvidia and everyone else keeps making. Most of this work we do for free because they’re small incremental changes. Every time you see Beauty Box v4.0.1 or 4.0.7 or 4.2.4 (the current one)… you can assume a lot of work went into that and you don’t have to pay anything. However, eventually the changes add up or Apple (most of the time it’s Apple) does some crazy thing that means we need to rewrite large portions of the plug-in. In either case, we rev the version number (i.e. 4.x to 5.0) and an upgrade is required.

We do not go back and ‘fix’ older versions of the software. We only update the most recent one. Such is the downside of Perpetual licenses. You can use that license forever, but if your host app or OS changes and that change breaks the version of the plugin you have… you need to upgrade to get a fix.

If one of your clients comes to you with a video you did for them in HD, and says ‘hey, I need this in 4K’. Would you redo the video for free? Probably not. They have a perpetual license for the HD version. It doesn’t entitle them to new versions of the video forever.

We want to support our customers. The reason we develop this stuff is because it’s awesome to see the cool things you all do with what we throw out there. If we didn’t have to do any work to maintain the software, we wouldn’t charge upgrade fees. Unfortunately, it is a lot of work. We want to support you, but if we go out of business, that’s probably not going to benefit either of us.

Apple may say it only takes two hours to recompile for Silicon and that may be true. But to go from that to a stable plugin that can be used in a professional environment and support different host apps and graphics cards and all that… it’s more like two months or more.

So, that’s why we charge upgrade fees. You’re paying for all the coding, design, and testing that goes into creating a professional product that you can rely on. Not too mention the San Francisco based support team to help you out with all of it. We’re here to help you be successful. The flipside is we need to do what’s necessary to make sure we’re successful ourselves.

Flicker Free 2.0: Up to 1500% faster!

We’re extremely excited about the speed improvements we’ve enhanced Flicker Free 2.0 with! Yes, we have actually seen 1500% performance increase with 4K footage, but on average across all resolutions and computers it’s usually 300-400% increase. Still pretty good and 4K is more like 700-800% on average.

You can see our performance benchmarks in this Google Doc. And download the benchmark projects for Premiere Pro (700mb) and for Final Cut Pro to run your own tests! (However, you need to run the FF1 sequences with FF1 and the FF2 (FF1 settings) with FF2. If you just turn off the GPU in FF2 you won’t get the same results (they’ll be slower than they would be in FF1)

However, it’s pretty dependent on your computer and what video editing app you’re using. We’ve been disappointed by MacBook Pros across the board. They’re just really under powered for the price. If you’re running a MacBook, we highly recommend getting an external GPU enclosure and putting in a high end AMD card. We’d recommend Nvidia as we do on Windows, but… Apple. Oh well.

It’s possible once we implement Metal (Apple’s technology to replace OpenCL) we’ll see some additional improvements. That’s coming in a free update shortly. In fact, because After Effects/Mac only supports Metal, Flicker Free isn’t accelerated at all in AE. It does great in Premiere which does support OpenCL. (Adobe’s GPU support is really lacking, and frustrating, across their video apps, but that’s a topic for another blog post)

Some notes about the Benchmark Google Doc:

  • It’s only Premiere and FCP
  • Not every computer ran every test. We changed the benchmark and didn’t have access to every machine to render the additional sequences.
  • Windows generally saw more improvement than Mac.
  • FCP saw some really significant gains. It’s much faster/efficient to get multiple frames in FCP using the GPU than the CPU. 1.0 was really slow in FCP.
  • The important bit is at the right edge of the spreadsheet where you see the percentages.
  • We’d love to see you run the benchmarks on your computer and please send us the results. If you do, please send results to cs@nulldigitalanarchy.com. However, you need to run the FF1 sequences with FF1 and the FF2 (FF1 settings) with FF2. If you just turn off the GPU in FF2 you won’t get the same results (they’ll be slower than they would be in FF1).
  • After Effects isn’t in the benchmark because AE/Mac doesn’t support OpenCL for GPU acceleration.
  • Davinci Resolve and Avid are coming soon!

Sharpening Video Footage

Like Digital Anarchy On Facebook


Sharpening video can be a bit trickier than sharpening photos. The process is the same of course… increasing the contrast around edges which creates the perception of sharpness.

However, because you’re dealing with 30fps instead of a single image some additional challenges are introduced:

1- Noise is more of a problem.
2- Video is frequently compressed more heavily than photos, so compression artifacts can be a serious problem.
3- Oversharpening is a problem with stills or video but can create motion artifacts when the video is played back that can be visually distracting.
4- It’s more difficult to mask out areas like skin that you don’t want sharpened.

These are problems you’ll run into regardless of the sharpening method. However, probably unsurprising, in addition to discussing the solutions using regular tools, we do talk about how our Samurai Sharpen plugin can help with them.

Noise in Video Footage

Noise is always a problem regardless of whether you’re shooting stills or videos. However, with video the noise changes from frame to frame making it a distraction to the viewer if there’s too much or it’s too pronounced.

Noise tends to be much more obvious in dark areas, as you can see below where it’s most apparent in the dark, hollow part of the guitar:

You can use Samurai Sharpen to avoid sharpening noise in video footage

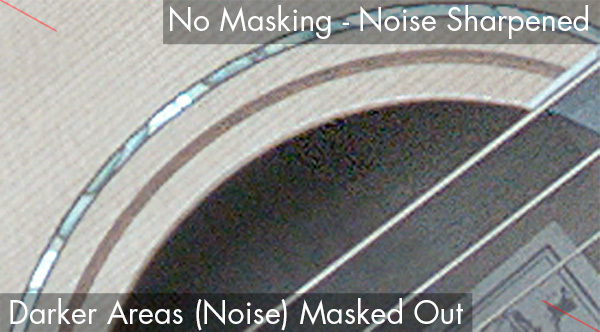
Using a mask to protect the darker areas makes it possible to increase the sharpening for the rest of the video frame. Samurai Sharpen has masks built-in, so it’s easy in that plugin, but you can do this manually in any video editor or compositing program by using keying tools, building a mask and compositing effects.

Compression Artifacts

Many consumer video cameras, including GoPros and some drone cameras heavily compress footage. Especially when shooting 4K.

It can be difficult to sharpen video that's been heavily compressed

It’s difficult, and sometimes impossible to sharpen footage like this. The  compression artifacts become very pronounced, since they tend to have edges like normal features. Unlike noise, the artifacts are visible in most areas of the footage, although they tend to be more obvious in areas with lots of detail.

In Samurai you can increase the Edge Mask Strength to lessen the impact of sharpening on the artifact (often they’re in low contrast) but depending on how compressed the footage is you may not want to sharpen it.

Oversharpening

Sharpening is a local contrast adjustment. It’s just looking at significant edges and sharpening those areas. Oversharpening occurs when there’s too much contrast around the edges, resulting in visible halos.

Too much sharpening of video can result in visible halos
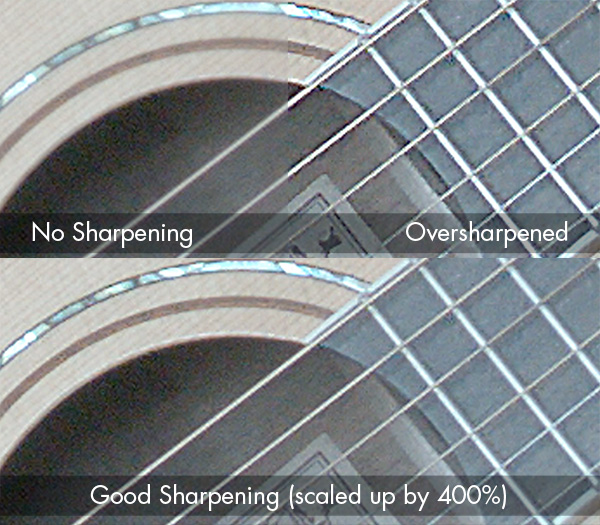
Especially if you look at the guitar strings and frets, you’ll see a dark halo on the outside of the strings and the strings themselves are almost white with little detail. Way too much contrast/sharpening. The usual solution is to reduce the sharpening amount.

In Samurai Sharpen you can also adjust the strength of the halos independently. So if the sharpening results in only the dark or light side being oversharpened, you can dial back just that side.

Sharpening Skin

The last thing you usually want to do is sharpen someone’s skin. You don’t want your talent’s skin looking like a dried-up lizard. (well, unless your talent is a lizard. Not uncommon these days with all the ridiculous 3D company mascots)

Sharpening video can result in skin being looking rough

Especially with 4K and HD, video is already showing more skin detail than most people want (hence the reason for our Beauty Box Video plugin for digital makeup). If you’re using UnSharp Mask you can use the Threshold parameter, or in Samurai the Edge Mask Strength parameter is a more powerful version of that. Both are good ways of protecting the skin from sharpening. The skin area tends to be fairly flat contrast-wise and the Edge Mask generally does a good job of masking the skin areas out.

Either way, you want to keep an eye on the skin areas, unless you want a lizard. (and if so, you should download are free Ugly Box plugin. ;-)

Wrap Up

You can sharpen video and most video footage will benefit from some sharpening. However, there are numerous issues that you run into and hopefully this gives you some idea of what you’re up against whether you’re using Samurai Sharpen for Video or something else.

Creative Cloud 2015 and After Effects, Premiere Pro Plug-ins

All of our current plugins have been updated to work with After Effects and Premiere Pro in Creative Cloud 2015. That means Beauty Box Video 4.0.1 and Flicker Free 1.1 are up to date and should work no problem.

Flicker Free 1.1 is a free update which you can download here: http://digitalanarchy.com/demos/main.html

What if I have an older plugin like Beauty Box 3.0.9? Do I have to pay for the upgrade?

Yes, you probably need to upgrade and it is a paid upgrade. After Effects changed the way it renders and Premiere Pro changed how they handle GPU plugins (of which Beauty Box is one). The key word here is probably. Our experience so far has been mixed. Sometimes the plugins work, sometimes not.

Premiere Pro: Beauty Box 3.0.9 seems to have trouble in Premiere if it’s using the GPU. If you turn ‘UseGPU’ off (at the bottom of the BB parameter list), it seems to work fine, albeit much slower. Premiere Pro did not implement the same re-design that After Effects did, but they did add an API specifically for GPU plugins. So if the plugin doesn’t use the GPU, it should work fine in Premiere. If it uses the GPU, maybe it works, maybe not. Beauty Box seems to not.

After Effects: Legacy plugins _should_ work but slow AE down somewhat. In the case of Beauty Box, it seems to work ok but we have seen some problems. So the bottom line is: try it out in CC 2015, if it works fine, you’re good to go. If not, you need to upgrade. We are not officially supporting 3.0.9 in Creative Cloud 2015.

– The upgrade from 3.0 is $69 and can be purchased HERE.

– The upgrade from 1.0/2.0 is $99 and can be purchased HERE.


The bottom line is try out the older plugins in CC 2015. It’s not a given that they won’t work, even though Adobe is telling everyone they need to update. It is true that you will most likely need to update the plugins for CC 2015 so their advice isn’t bad. However, before paying for upgrades load the plugins and see how they behave. They might work fine. Of course, Beauty Box 4 is super fast in both Premiere and After Effects, so you might want to upgrade anyways. :-)

We do our best not to force users into upgrades, but since Adobe has rejiggered everything, only the current releases of our products will be rejiggered in turn.

4K Showdown! New MacPro vs One Nvidia GTX 980

Like Digital Anarchy On Facebook


For NAB this year we finally bought into the 4K hype and decided to have one of our demo screens be a 4K model, showing off Beauty Box Video and Flicker Free in glorious 4K.

NAB Booth Beauty Box Video and Flicker Free in 4k
The Digital Anarchy NAB Booth

So we bought a 55” 4K Sony TV to do the honors. We quickly realized if we wanted to use it for doing live demos we would need a 4K monitor as well. (We could have just shown the demo reel on it) For live demos you need to mirror the computer monitor onto the TV. An HD monitor upscaled on the 4K TV looked awful, so a 4K monitor it was (we got a Samsung 28″, gorgeous monitor).

Our plan was to use our Mac Pro for this demo station. We wanted to show off the plugins in Adobe’s AE/Premiere apps and Apple’s Final Cut Pro. Certainly our $4000 middle of the line Mac Pro with two AMD D500s could drive two 4K screens. Right?

We were a bit dismayed to discover that it would drive the screens at the cost of slowing the machine down to unusable. Not good.

For running Beauty Box in GPU accelerated mode, our new favorite video card for GPU performance is Nvidia’s GTX 980. The price/performance ratio is just amazing. So we figured we’d plug the two 4K screens into our generic $900 Costco PC that had the GTX 980 in it and see what kind of performance we’d get out of it.

Not only did the 980 drive the monitors, it still ran Beauty Box Video in real time within Premiere Pro. F’ing amazing for a $550 video card.

The GTX 980 single handedly knocked out the Mac Pro and two AMD D500s. Apple should be embarrassed.

I will note, that for rendering and using the apps, the Mac Pro is about on par with the $900 PC + 980. I still would expect more performance from Apple’s $4000 machine but at least it’s not an embarrassment.